Swift
Swift is a general-purpose programming language design by Apple released on 2014. It can be use to develop software for Apple products, server, and embedded device. Swift by syntax share similarity with strict type programming language like Java, Go, and PHP (version 8 and above). I try Swift in Swift Playgrounds and I create a YouTube playlist of my progress to learn Swift: Swift Playgrounds - Learn to Code 1 and Swift Playgrounds - Learn to Code 2 - Quick Review.
Syntax
In Swift, you can declare variable in two ways: a mutable variable with var keyword and immutable variable with let keyword. Mutable variable means you can change the value of variable after you declare a variable. Immutable variable means you cannot change the value of variable after you declare a variable.
// Mutable variable with `var` keyword.
var count = 2
count = 3 // It works

// Immutable variable with `let` keyword.
let name = "Kresna"
name = "Satya" // It doesn't work.
Swift also a strict-type programming language. It means when you declare a mutable variable with specific type (e.g. Int) then you can only change the value of variable only with Int type.
var count = 1
count = 2 // Allowed
count = "foo" // Not allowed and it will throw error
Swift doesn't need a semicolon ; after you declare variable. Also, Swift doesn't need parentheses when declare control flow statement, loop statement.
var isRain = true

if isRain {
    print("bring umbrella") // Output result.
} else {
    print("let's go")
}

for index in 1...5 {
    print("\(index) time 5 is \(index * 5)")
}
// Ouput:
// 1 times 5 is 5
// 2 times 5 is 10
// 3 times 5 is 15
// 4 times 5 is 20
// 5 times 5 is 25
If you want to concat variable in a string you can use \() syntax or + operator.
let firstName = "Kresna"
let lastName = "Satya"
print("My name is \(firstName) \(lastName)") // My name is Kresna Satya
print("My name is " + firstName + " " + lastName) // My name is Kresna Satya
SwiftUI
SwiftUI
SwiftUI is a Swift framework to create a User Interface for app in Apple products. It was released on 2019 at WWDC2019. When I watch the announcement of SwiftUI, my mind was blown away! I cannot believe that you can shipped less code to build User Interface for mobile app. In the past, I build Android App with Java programming + XML on Android Studio. Now, Kotlin replace Java as a recommended programming language to build Android App so you can write less code to build User Interface for Android App. But, if I compare Kotlin with SwiftUI by syntax, SwiftUI is a winner because of less code. Here's comparison between SwiftUI and Kotlin when create a screen "Hello, World".
    import SwiftUI

    struct ContentView: View {
        var body: some View {
            Text("Hello, World")
        }
    }

    #Preview {
        ContentView()
            .environment(ModelData())
} package com.example.greetingcard
import android.os.Bundle
import androidx.activity.ComponentActivity
import androidx.activity.compose.setContent
import androidx.compose.foundation.layout.fillMaxSize
import androidx.compose.foundation.layout.padding
import androidx.compose.material3.MaterialTheme
import androidx.compose.material3.Surface
import androidx.compose.material3.Text
import androidx.compose.runtime.Composable
import androidx.compose.ui.Modifier
import androidx.compose.ui.graphics.Color
import androidx.compose.ui.tooling.preview.Preview
import androidx.compose.ui.unit.dp
import com.example.greetingcard.ui.theme.GreetingCardTheme
class MainActivity : ComponentActivity() {
override fun onCreate(savedInstanceState: Bundle?) {
super.onCreate(savedInstanceState)
setContent {
GreetingCardTheme {
// A surface container using the 'background' color from the theme
Surface(
modifier = Modifier.fillMaxSize(),
color = MaterialTheme.colorScheme.background
) {
Greeting("Android")
}
}
}
}
}
@Composable
fun Greeting(name: String, modifier: Modifier = Modifier) {
Surface(color = Color.Cyan) {
Text(
text = "Hi, my name is $name!",
modifier = modifier.padding(24.dp)
)
}
}
@Preview(showBackground = true)
@Composable
fun GreetingPreview() {
GreetingCardTheme {
Greeting("Meghan")
}
}I can say that SwiftUI is better than Kotlin. Maybe sounds trivial or weird for you but for me if I want to see the programming language is good or bad, I will see by the syntax definition at first. I think I don't want to back to programming Kotlin for Android app for a distant moment. I'm using MacBook Air M1 with 256GB storage and 8GB of RAM for programming with Swift and SwiftUI in Xcode. I can't believe that this machine is strong enough to do that! Thanks Apple Silicon.
Learning Resources
Repeat, repeat, and repeat again until you understand!
Develop in Swift
This is the first stop to start learning Swift and SwiftUI. When I first time visit this site, it feels like I'm in a vast forest. A lot of informations appears and blown my head! A lot of things to try and try again to understand how it works. It's a great journey! No, no! I don't mean this site is bad! Instead this site is really-really well! It gives me step-by-step how to do that with clear explanation with code snippet, image, and preview.
Site: Develop in Swift | Apple Developer Documentation
SwiftUI Tutorials
This is the next site to pick after you try Develop in Swift. This site will give you a comprehensive tutorial how to code with SwiftUI by create a project called "Landmarks". You will learn SwiftUI Essentials, Drawing and animation, App Design and layout, Framework integration.
Site: SwiftUI Tutorials | Apple Developer Documentation
SwiftUI Concepts
After you try Introducing SwiftUI, you must visit and read the SwiftUI Concepts. It covers structure of a Swift app project, how to layout, and how to state and data flow. It also gives you a code sample to try in your Xcode. But, becareful you may not be able to run the code sample on Xcode because of different Team. The error will be Error: No Signing certificate “Mac Development” found. Fortunately, I write a guide how to solve this problem in Xcode tools section.
Site: SwiftUI Concepts | Apple Developer Documentation
Sample Apps Tutorials
This site covers sample apps build with Swift and SwiftUI from navigating apps, presenting content, retrieving content from a server, responding to user input, capturing and displaying photos, and get started with machine learning.
Site: Sample Apps Tutorials | Apple Developer Documentation
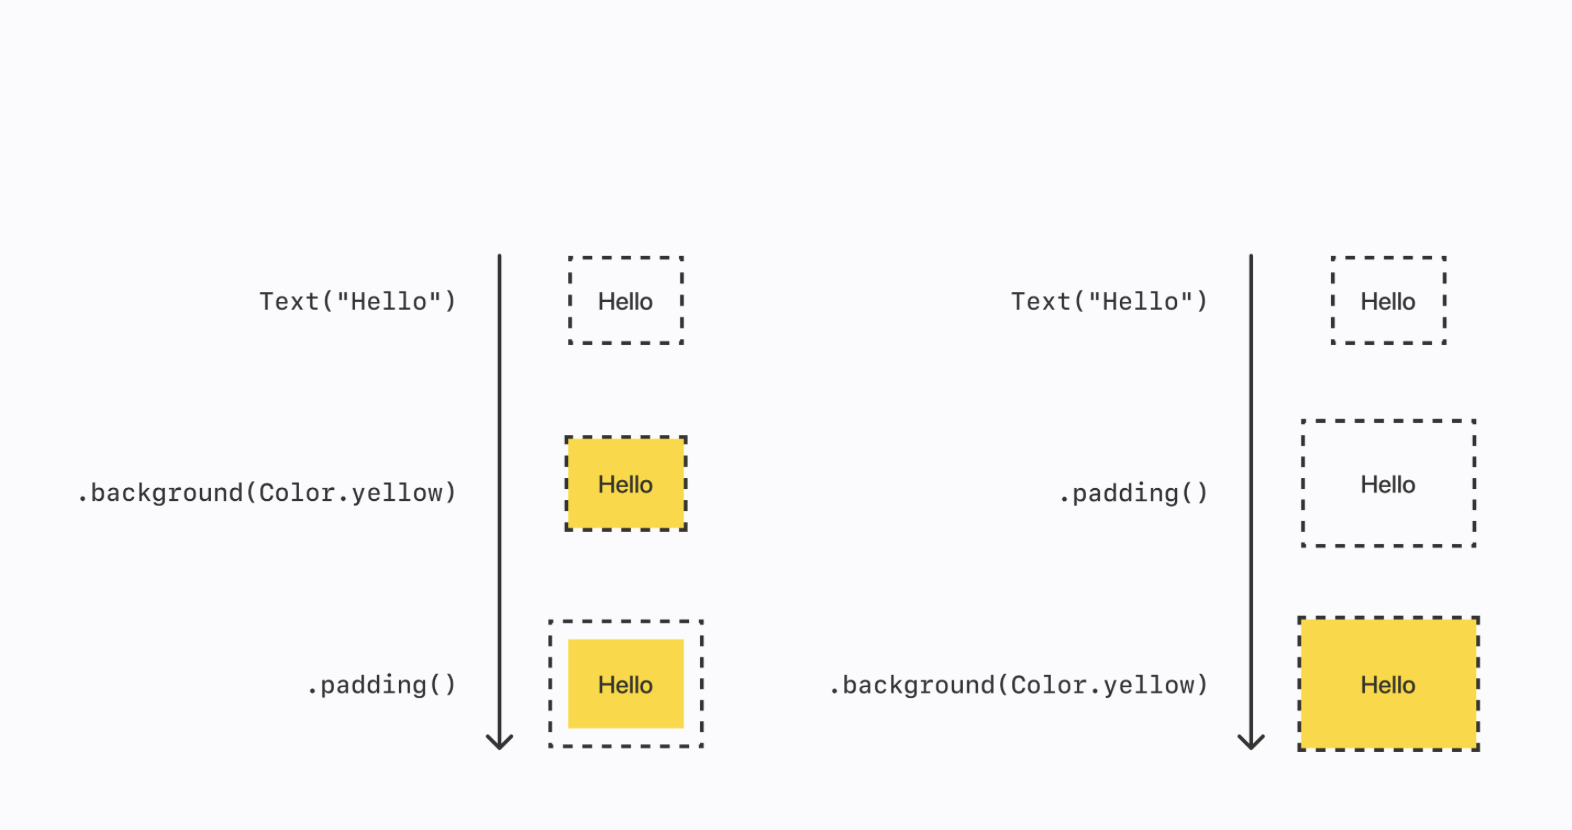
Padding in SwiftUI
The .padding modifier creates a new padded view with empty space around it, which is affected by any modifiers coming after it. If you want the padded area to have background color, you must modify that padded view.
// ChatPrototype

import SwiftUI

struct ContentView: View {
		var body: some View {
				VStack {
						Text("Hello")
								.background(Color.yellow)
								.padding()
						Text("Hello")
								.padding()
								.background(Color.yellow)
				}
				.padding()
		}
}
Xcode
I can't believe that I can use Xcode for programming Swift and SwiftUI with MacBook Air M1 with 256GB storage and 8GB of RAM. I can't believe that this machine is strong enough to do that! Thanks Apple Silicon.
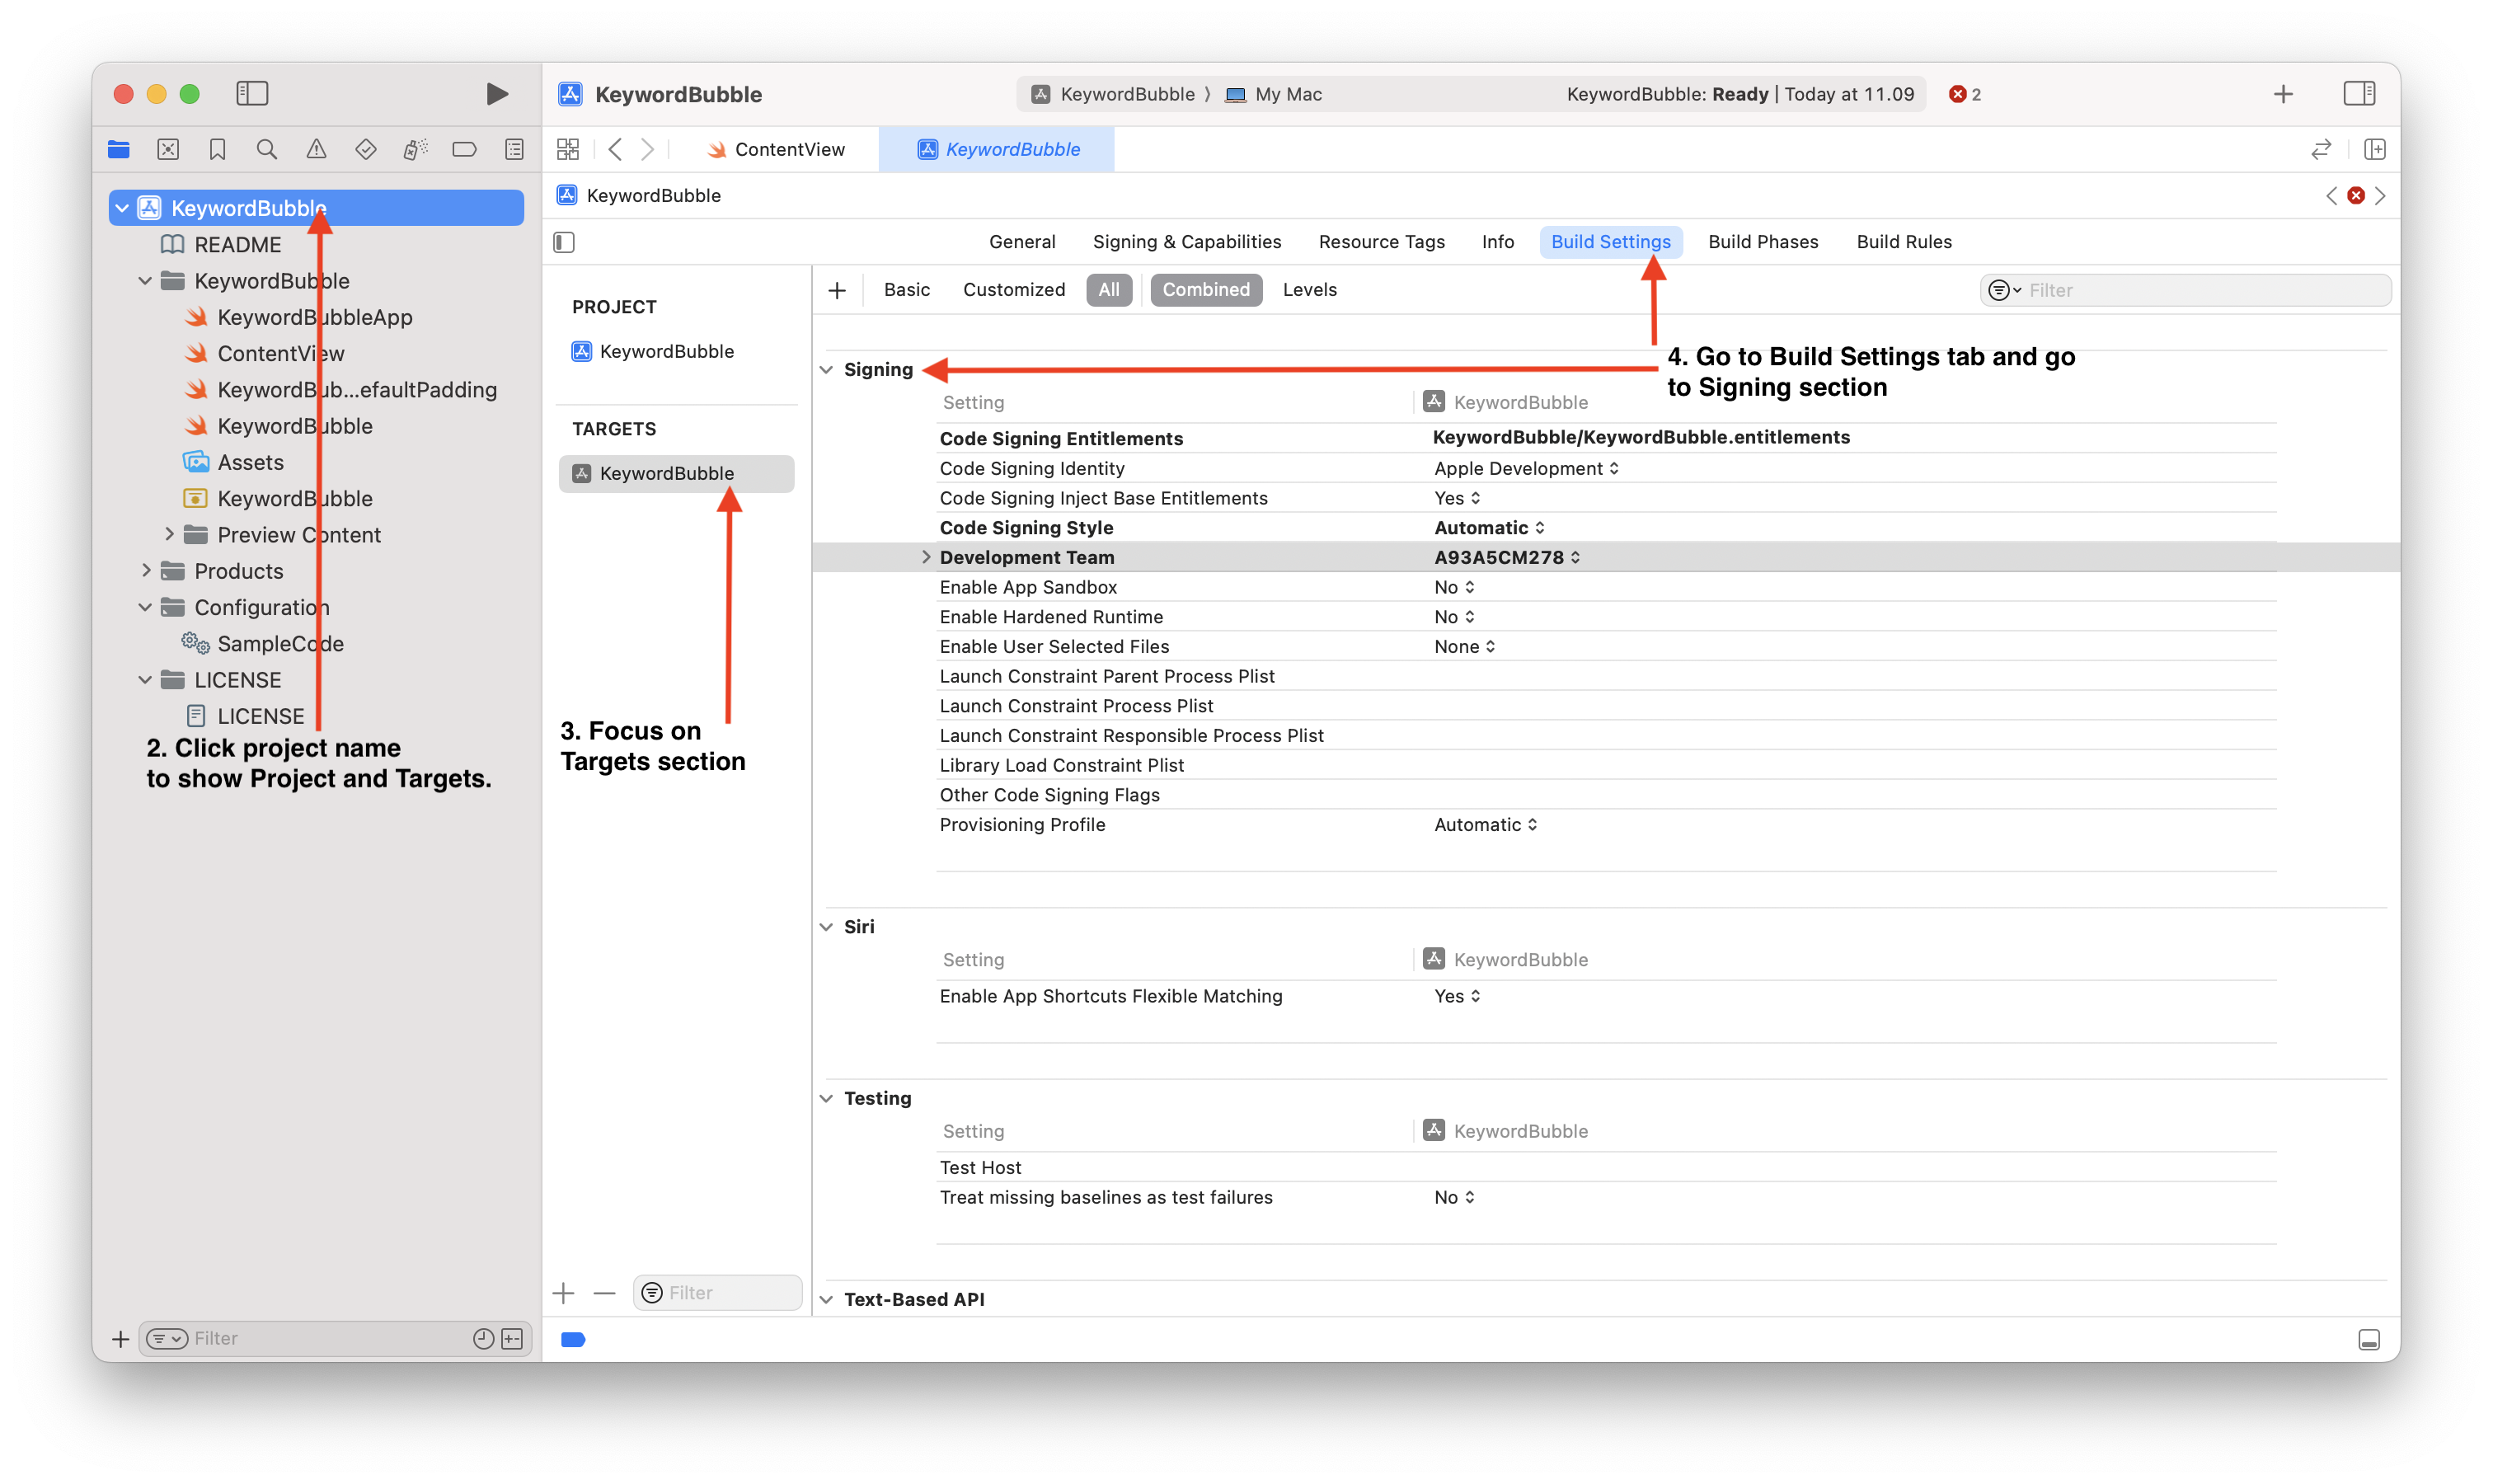
Error: No Signing certificate “Mac Development” found
There's a case when you run a code sample from third party and you get error message below. Here's the example.
No signing certificate "Mac Development" found: No "Mac Development" signing certificate matching team ID "A93A5CM278" with a private key was found. (in target 'Keyword Bubble' from project 'KeywordBubble')
How to solve it?
- Open your project in Xcode
- On the project navigator, click project name to show Project and Targets.
- Focus on Targets section.
- In Targets > Build Settings > Signing
- Change value of Code Signing Identity to Sign to run locally
- Change value of Code Signing Style to Manual
- Change value of Development Team to Personal or None
- Try again and see if works!